Create BookInstance form
This subarticle shows how to define a page/form to create BookInstance objects.
This is very much like the form we used to create Book objects.
Import validation and sanitization methods
Open /controllers/bookinstanceController.js, and add the following lines at the top of the file:
const { body, validationResult } = require("express-validator");
Controller—get route
At the top of the file, require the Book module (needed because each BookInstance is associated with a particular Book).
const Book = require("../models/book");
Find the exported bookinstance_create_get() controller method and replace it with the following code.
// Display BookInstance create form on GET.
exports.bookinstance_create_get = asyncHandler(async (req, res, next) => {
  const allBooks = await Book.find({}, "title").sort({ title: 1 }).exec();

  res.render("bookinstance_form", {
    title: "Create BookInstance",
    book_list: allBooks,
  });
});
The controller gets a sorted list of all books (allBooks) and passes it via book_list to the view bookinstance_form.pug (along with a title).
Note that no book has been selected when we first display this form, so we don't pass the selected_book variable to render().
Because of this, selected_book will have a value of undefined in the template.
Controller—post route
Find the exported bookinstance_create_post() controller method and replace it with the following code.
// Handle BookInstance create on POST.
exports.bookinstance_create_post = [
  // Validate and sanitize fields.
  body("book", "Book must be specified").trim().isLength({ min: 1 }).escape(),
  body("imprint", "Imprint must be specified")
    .trim()
    .isLength({ min: 1 })
    .escape(),
  body("status").escape(),
  body("due_back", "Invalid date")
    .optional({ values: "falsy" })
    .isISO8601()
    .toDate(),

  // Process request after validation and sanitization.
  asyncHandler(async (req, res, next) => {
    // Extract the validation errors from a request.
    const errors = validationResult(req);

    // Create a BookInstance object with escaped and trimmed data.
    const bookInstance = new BookInstance({
      book: req.body.book,
      imprint: req.body.imprint,
      status: req.body.status,
      due_back: req.body.due_back,
    });

    if (!errors.isEmpty()) {
      // There are errors.
      // Render form again with sanitized values and error messages.
      const allBooks = await Book.find({}, "title").sort({ title: 1 }).exec();

      res.render("bookinstance_form", {
        title: "Create BookInstance",
        book_list: allBooks,
        selected_book: bookInstance.book._id,
        errors: errors.array(),
        bookinstance: bookInstance,
      });
      return;
    } else {
      // Data from form is valid
      await bookInstance.save();
      res.redirect(bookInstance.url);
    }
  }),
];
The structure and behavior of this code is the same as for creating our other objects.
First we validate and sanitize the data. If the data is invalid, we then re-display the form along with the data that was originally entered by the user and a list of error messages.
If the data is valid, we save the new BookInstance record and redirect the user to the detail page.
View
Create /views/bookinstance_form.pug and copy in the text below.
extends layout

block content
  h1=title

  form(method='POST')
    div.form-group
      label(for='book') Book:
      select#book.form-control(name='book' required)
        option(value='') --Please select a book--
        for book in book_list
          if selected_book==book._id.toString()
            option(value=book._id, selected) #{book.title}
          else
            option(value=book._id) #{book.title}

    div.form-group
      label(for='imprint') Imprint:
      input#imprint.form-control(type='text' placeholder='Publisher and date information' name='imprint' required value=(undefined===bookinstance ? '' : bookinstance.imprint) )
    div.form-group
      label(for='due_back') Date when book available:
      input#due_back.form-control(type='date' name='due_back' value=(undefined===bookinstance ? '' : bookinstance.due_back_yyyy_mm_dd))

    div.form-group
      label(for='status') Status:
      select#status.form-control(name='status' required)
        option(value='') --Please select a status--
        each val in ['Maintenance', 'Available', 'Loaned', 'Reserved']
          if undefined===bookinstance || bookinstance.status!=val
            option(value=val)= val
          else
            option(value=val selected)= val

    button.btn.btn-primary(type='submit') Submit

  if errors
    ul
      for error in errors
        li!= error.msg
Note: The above template hard-codes the Status values (Maintenance, Available, etc.) and does not "remember" the user's entered values. Should you so wish, consider reimplementing the list, passing in option data from the controller and setting the selected value when the form is re-displayed.
The view structure and behavior is almost the same as for the book_form.pug template, so we won't go over it in detail.
The one thing to note is the line where we set the "due back" date to bookinstance.due_back_yyyy_mm_dd if we are populating the date input for an existing instance.
input#due_back.form-control(type='date', name='due_back' value=(undefined===bookinstance ? '' : bookinstance.due_back_yyyy_mm_dd))
The date value has to be set in the format YYYY-MM-DD because this is expected by <input> elements with type="date", however the date is not stored in this format so we have to convert it before setting the value in the control.
The due_back_yyyy_mm_dd() method is added to the BookInstance model in the next section.
Model—virtual due_back_yyyy_mm_dd() method
Open the file where you defined the BookInstanceSchema model (models/bookinstance.js).
Add the due_back_yyyy_mm_dd() virtual function shown below (after the due_back_formatted() virtual function):
BookInstanceSchema.virtual("due_back_yyyy_mm_dd").get(function () {
  return DateTime.fromJSDate(this.due_back).toISODate(); // format 'YYYY-MM-DD'
});
What does it look like?
Run the application and open your browser to http://localhost:3000/.
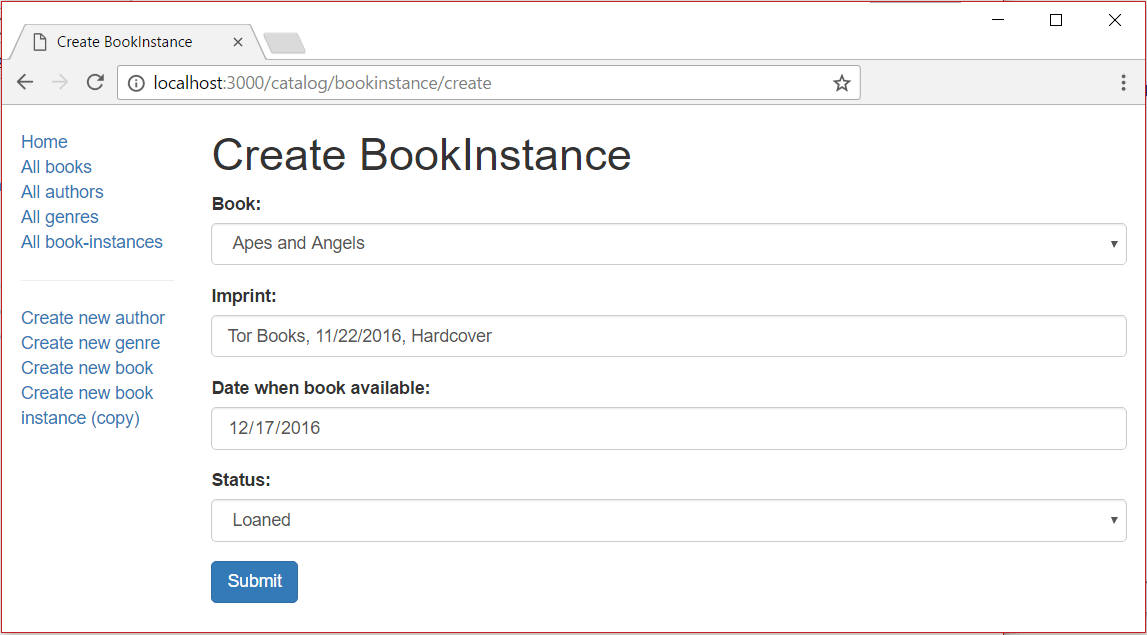
Then select the Create new book instance (copy) link. If everything is set up correctly, your site should look something like the following screenshot. After you submit a valid BookInstance, it should be saved and you'll be taken to the detail page.

Next steps
- Return to Express Tutorial Part 6: Working with forms.
- Proceed to the next subarticle of part 6: Delete Author form.