HTML 入门
在本文中,我们将介绍 HTML 的绝对基础知识。为了帮助你入门,本文定义了元素、属性以及你可能听说过的所有其他重要术语。它还解释了它们在 HTML 中的位置。你将了解 HTML 元素的结构、典型的 HTML 页面的结构以及其他重要的基本语言功能。在此过程中,你还将有机会使用 HTML!
¥In this article, we cover the absolute basics of HTML. To get you started, this article defines elements, attributes, and all the other important terms you may have heard. It also explains where these fit into HTML. You will learn how HTML elements are structured, how a typical HTML page is structured, and other important basic language features. Along the way, there will be an opportunity to play with HTML too!
什么是 HTML?
¥What is HTML?
HTML(超文本标记语言)是一种标记语言,它告诉网络浏览器如何构建你访问的网页。它可以像 Web 开发者希望的那样复杂或简单。HTML 由一系列 elements 组成,你可以使用它们来包围、封装或标记内容的不同部分,以使其以某种方式显示或运行。封闭的 tags 可以将内容制作成超链接以连接到另一个页面、将单词变为斜体等等。例如,考虑以下文本行:
¥HTML (HyperText Markup Language) is a markup language that tells web browsers how to structure the web pages you visit. It can be as complicated or as simple as the web developer wants it to be. HTML consists of a series of elements, which you use to enclose, wrap, or mark up different parts of content to make it appear or act in a certain way. The enclosing tags can make content into a hyperlink to connect to another page, italicize words, and so on. For example, consider the following line of text:
My cat is very grumpy
如果我们希望文本独立存在,我们可以通过将其包含在段落 (<p>) 元素中来指定它是一个段落:
¥If we wanted the text to stand by itself, we could specify that it is a paragraph by enclosing it in a paragraph (<p>) element:
<p>My cat is very grumpy</p>
注意:HTML 中的标签不区分大小写。这意味着它们可以用大写或小写书写。例如,
<title>标签可以写成<title>、<TITLE>、<Title>、<TiTlE>等,这样就可以了。但是,为了一致性和可读性,最佳做法是用小写形式编写所有标签。¥Note: Tags in HTML are not case-sensitive. This means they can be written in uppercase or lowercase. For example, a
<title>tag could be written as<title>,<TITLE>,<Title>,<TiTlE>, etc., and it will work. However, it is best practice to write all tags in lowercase for consistency and readability.
HTML 元素剖析
¥Anatomy of an HTML element
让我们进一步探讨上一节中的段落元素:
¥Let's further explore our paragraph element from the previous section:

我们元素的剖析结构是:
¥The anatomy of our element is:
- 开始标签:它由元素的名称(在本例中,p 代表段落)组成,包含在左尖括号和右尖括号中。此开始标记标记元素开始或开始生效的位置。在此示例中,它位于段落文本的开头之前。
- 内容:这是元素的内容。在此示例中,它是段落文本。
- 结束标签:这与开始标记相同,只是它在元素名称之前包含一个正斜杠。这标志着元素结束的位置。不包含结束标签是初学者常见的错误,可能会产生特殊的结果。
该元素是开始标记,后面是内容,最后是结束标记。
¥The element is the opening tag, followed by content, followed by the closing tag.
主动学习:创建你的第一个 HTML 元素
¥Active learning: creating your first HTML element
在 "可编辑代码" 区域编辑下面的行,用标签 <em> 和 </em>. 包裹它。 要打开该元素,请将开始标签 <em> 放在该行的开头。要关闭该元素,请将结束标记 </em> 放在该行的末尾。这样做应该会给该行斜体文本格式!在输出区域中实时查看你的更改更新。
¥Edit the line below in the "Editable code" area by wrapping it with the tags <em> and </em>. To open the element, put the opening tag <em> at the start of the line. To close the element, put the closing tag </em> at the end of the line. Doing this should give the line italic text formatting! See your changes update live in the Output area.
如果你犯了错误,你可以使用“重置”按钮清除你的工作。如果你确实遇到困难,请按“显示解决方案”按钮查看答案。
¥If you make a mistake, you can clear your work using the Reset button. If you get really stuck, press the Show solution button to see the answer.
<h2>Live output</h2>
<div class="output" style="min-height: 50px;"></div>

<h2>Editable code</h2>
<p class="a11y-label">
  Press Esc to move focus away from the code area (Tab inserts a tab character).
</p>

<textarea id="code" class="playable-code" style="min-height: 100px;width: 95%">
  This is my text.
</textarea>

<div class="controls">
  <input id="reset" type="button" value="Reset" />
  <input id="solution" type="button" value="Show solution" />
</div>
html {
  font-family: "Open Sans Light", Helvetica, Arial, sans-serif;
}

h2 {
  font-size: 16px;
}

.a11y-label {
  margin: 0;
  text-align: right;
  font-size: 0.7rem;
  width: 98%;
}

body {
  margin: 10px;
  background: #f5f9fa;
}
const textarea = document.getElementById("code");
const reset = document.getElementById("reset");
const solution = document.getElementById("solution");
const output = document.querySelector(".output");
const code = textarea.value;
let userEntry = textarea.value;

function updateCode() {
  output.innerHTML = textarea.value;
}

const htmlSolution = "<em>This is my text.</em>";
let solutionEntry = htmlSolution;

reset.addEventListener("click", () => {
  textarea.value = code;
  userEntry = textarea.value;
  solutionEntry = htmlSolution;
  solution.value = "Show solution";
  updateCode();
});

solution.addEventListener("click", () => {
  if (solution.value === "Show solution") {
    textarea.value = solutionEntry;
    solution.value = "Hide solution";
  } else {
    textarea.value = userEntry;
    solution.value = "Show solution";
  }
  updateCode();
});

textarea.addEventListener("input", updateCode);
window.addEventListener("load", updateCode);

// stop tab key tabbing out of textarea and
// make it write a tab at the caret position instead
textarea.onkeydown = (e) => {
  if (e.code === "Tab") {
    e.preventDefault();
    insertAtCaret("\t");
  }

  if (e.code === "Escape") {
    textarea.blur();
  }
};

function insertAtCaret(text) {
  const scrollPos = textarea.scrollTop;
  let caretPos = textarea.selectionStart;

  const front = textarea.value.substring(0, caretPos);
  const back = textarea.value.substring(
    textarea.selectionEnd,
    textarea.value.length,
  );
  textarea.value = front + text + back;
  caretPos += text.length;
  textarea.selectionStart = caretPos;
  textarea.selectionEnd = caretPos;
  textarea.focus();
  textarea.scrollTop = scrollPos;
}

// Update the saved userCode every time the user updates the text area code

textarea.onkeyup = () => {
  // We only want to save the state when the user code is being shown,
  // not the solution, so that solution is not saved over the user code
  if (solution.value === "Show solution") {
    userEntry = textarea.value;
  } else {
    solutionEntry = textarea.value;
  }

  updateCode();
};
嵌套元素
¥Nesting elements
元素可以放置在其他元素内。这称为嵌套。如果我们想表明我们的猫非常脾气暴躁,我们可以将单词 very 封装在 <strong> 元素中,这意味着该单词具有强(呃)文本格式:
¥Elements can be placed within other elements. This is called nesting. If we wanted to state that our cat is very grumpy, we could wrap the word very in a <strong> element, which means that the word is to have strong(er) text formatting:
<p>My cat is <strong>very</strong> grumpy.</p>
嵌套的方法有正确和错误之分。在上面的示例中,我们首先打开 p 元素,然后打开 strong 元素。为了正确嵌套,我们应该先关闭 strong 元素,然后再关闭 p。
¥There is a right and wrong way to do nesting. In the example above, we opened the p element first, then opened the strong element. For proper nesting, we should close the strong element first, before closing the p.
以下是错误嵌套方法的示例:
¥The following is an example of the wrong way to do nesting:
<p>My cat is <strong>very grumpy.</p></strong>
标签必须以彼此在内部或外部的方式打开和关闭。对于上面示例中的重叠,浏览器必须猜测你的意图。这种猜测可能会导致意想不到的结果。
¥The tags have to open and close in a way that they are inside or outside one another. With the kind of overlap in the example above, the browser has to guess at your intent. This kind of guessing can result in unexpected results.
虚空元素
¥Void elements
并非所有元素都遵循开始标记、内容和结束标记的模式。某些元素由单个标签组成,通常用于在文档中插入/嵌入某些内容。此类元素称为 void elements。例如,<img> 元素将图片文件嵌入到页面上:
¥Not all elements follow the pattern of an opening tag, content, and a closing tag. Some elements consist of a single tag, which is typically used to insert/embed something in the document. Such elements are called void elements. For example, the <img> element embeds an image file onto a page:
<img
  src="https://raw.githubusercontent.com/mdn/beginner-html-site/gh-pages/images/firefox-icon.png"
  alt="Firefox icon" />
这将输出以下内容:
¥This would output the following:
注意:在 HTML 中,不需要在 void 元素的标记末尾添加
/,例如:<img src="images/cat.jpg" alt="cat" />。然而,它也是一种有效的语法,当你希望 HTML 成为有效的 XML 时,你可以这样做。¥Note: In HTML, there is no requirement to add a
/at the end of a void element's tag, for example:<img src="images/cat.jpg" alt="cat" />. However, it is also a valid syntax, and you may do this when you want your HTML to be valid XML.
属性
¥Attributes
元素也可以有属性。属性看起来像这样:
¥Elements can also have attributes. Attributes look like this:

属性包含有关不会出现在内容中的元素的额外信息。在此示例中,class 属性是一个标识名称,用于将样式信息定位到元素。
¥Attributes contain extra information about the element that won't appear in the content. In this example, the class attribute is an identifying name used to target the element with style information.
一个属性应该有:
¥An attribute should have:
- 它和元素名称之间有一个空格。(对于具有多个属性的元素,属性也应该用空格分隔。)
- 属性名称,后跟等号。
- 属性值,用左引号和右引号括起来。
主动学习:向元素添加属性
¥Active learning: Adding attributes to an element
<img> 元素可以采用许多属性,包括:
¥The <img> element can take a number of attributes, including:
src-
src属性是指定图片位置的必需属性。例如:src="https://raw.githubusercontent.com/mdn/beginner-html-site/gh-pages/images/firefox-icon.png"。 alt-
alt属性指定图片的文本描述。例如:alt="The Firefox icon"。 width-
width属性指定图片的宽度,单位为像素。例如:width="300"。 height-
height属性指定图片的高度,单位为像素。例如:height="300"。
在输入区域中编辑下面的行以将其转换为图片。
¥Edit the line below in the Input area to turn it into an image.
- 在线查找你最喜欢的图片,右键单击它,然后按复制图片链接/地址。
- 返回下面的区域,添加
src属性并使用步骤 1 中的链接填充它。 - 设置
alt属性。 - 添加
width和height属性。
你将能够在输出区域实时看到你的更改。
¥You will be able to see your changes live in the Output area.
如果你犯了错误,你可以随时使用“重置”按钮进行重置。如果你确实遇到困难,请按“显示解决方案”按钮查看答案。
¥If you make a mistake, you can always reset it using the Reset button. If you get really stuck, press the Show solution button to see the answer.
<h2>Live output</h2>
<div class="output" style="min-height: 50px;"></div>
<h2>Editable code</h2>
<p class="a11y-label">
Press Esc to move focus away from the code area (Tab inserts a tab character).
</p>
<textarea id="code" class="input" style="min-height: 100px;width: 95%">
<img alt="I should be an image" >
</textarea>
<div class="playable-buttons">
<input id="reset" type="button" value="Reset" />
<input id="solution" type="button" value="Show solution" />
</div>
html {
  font-family: sans-serif;
}

h2 {
  font-size: 16px;
}

.a11y-label {
  margin: 0;
  text-align: right;
  font-size: 0.7rem;
  width: 98%;
}

body {
  margin: 10px;
  background: #f5f9fa;
}
const textarea = document.getElementById("code");
const reset = document.getElementById("reset");
const solution = document.getElementById("solution");
const output = document.querySelector(".output");
const code = textarea.value;
let userEntry = textarea.value;

function updateCode() {
  output.innerHTML = textarea.value;
}

const htmlSolution =
  '<img src="https://raw.githubusercontent.com/mdn/beginner-html-site/gh-pages/images/firefox-icon.png" alt="Firefox icon" width="100" height="100" />';
let solutionEntry = htmlSolution;

reset.addEventListener("click", () => {
  textarea.value = code;
  userEntry = textarea.value;
  solutionEntry = htmlSolution;
  solution.value = "Show solution";
  updateCode();
});

solution.addEventListener("click", () => {
  if (solution.value === "Show solution") {
    textarea.value = solutionEntry;
    solution.value = "Hide solution";
  } else {
    textarea.value = userEntry;
    solution.value = "Show solution";
  }
  updateCode();
});

textarea.addEventListener("input", updateCode);
window.addEventListener("load", updateCode);

// stop tab key tabbing out of textarea and
// make it write a tab at the caret position instead

textarea.onkeydown = (e) => {
  if (e.code === "Tab") {
    e.preventDefault();
    insertAtCaret("\t");
  }

  if (e.code === "Escape") {
    textarea.blur();
  }
};

function insertAtCaret(text) {
  const scrollPos = textarea.scrollTop;
  let caretPos = textarea.selectionStart;

  const front = textarea.value.substring(0, caretPos);
  const back = textarea.value.substring(
    textarea.selectionEnd,
    textarea.value.length,
  );
  textarea.value = front + text + back;
  caretPos += text.length;
  textarea.selectionStart = caretPos;
  textarea.selectionEnd = caretPos;
  textarea.focus();
  textarea.scrollTop = scrollPos;
}

// Update the saved userCode every time the user updates the text area code

textarea.onkeyup = () => {
  // We only want to save the state when the user code is being shown,
  // not the solution, so that solution is not saved over the user code
  if (solution.value === "Show solution") {
    userEntry = textarea.value;
  } else {
    solutionEntry = textarea.value;
  }

  updateCode();
};
布尔属性
¥Boolean attributes
有时你会看到没有值的属性。这是完全可以接受的。这些称为布尔属性。布尔属性只能有一个值,该值一般与属性名称相同。例如,考虑 disabled 属性,你可以将其分配给表单输入元素。(你可以使用它来禁用表单输入元素,以便用户无法进行输入。禁用的元素通常具有灰色外观。)例如:
¥Sometimes you will see attributes written without values. This is entirely acceptable. These are called Boolean attributes. Boolean attributes can only have one value, which is generally the same as the attribute name. For example, consider the disabled attribute, which you can assign to form input elements. (You use this to disable the form input elements so the user can't make entries. The disabled elements typically have a grayed-out appearance.) For example:
<input type="text" disabled="disabled" />
作为简写,可以这样写:
¥As shorthand, it is acceptable to write this as follows:
<!-- using the disabled attribute prevents the end user from entering text into the input box -->
<input type="text" disabled />

<!-- text input is allowed, as it doesn't contain the disabled attribute -->
<input type="text" />
作为参考,上面的示例还包括非禁用的表单输入元素。上面示例中的 HTML 产生以下结果:
¥For reference, the example above also includes a non-disabled form input element. The HTML from the example above produces this result:
省略属性值周围的引号
¥Omitting quotes around attribute values
如果你查看许多其他网站的代码,你可能会遇到许多奇怪的标记样式,包括不带引号的属性值。在某些情况下这是允许的,但在其他情况下也可能会破坏你的标记。下面代码片段中的元素 <a> 称为锚点。锚点包含文本并将其转换为链接。href 属性指定链接指向的网址。你可以仅使用 href 属性编写下面的基本版本,如下所示:
¥If you look at code for a lot of other sites, you might come across a number of strange markup styles, including attribute values without quotes. This is permitted in certain circumstances, but it can also break your markup in other circumstances. The element in the code snippet below, <a>, is called an anchor. Anchors enclose text and turn them into links. The href attribute specifies the web address the link points to. You can write this basic version below with only the href attribute, like this:
<a href=https://www.mozilla.org/>favorite website</a>
锚点还可以具有 title 属性,即链接页面的描述。然而,一旦我们以与 href 属性相同的方式添加 title ,就会出现问题:
¥Anchors can also have a title attribute, a description of the linked page. However, as soon as we add the title in the same fashion as the href attribute there are problems:
<a href=https://www.mozilla.org/ title=The Mozilla homepage>favorite website</a>
如上所述,浏览器误解了标记,将 title 属性误认为是三个属性:一个值为 The 的标题属性,以及两个布尔属性 Mozilla 和 homepage。显然,这不是故意的!它将导致错误或意外行为,如下面的实时示例所示。尝试将鼠标悬停在链接上以查看标题文本!
¥As written above, the browser misinterprets the markup, mistaking the title attribute for three attributes: a title attribute with the value The, and two Boolean attributes, Mozilla and homepage. Obviously, this is not intended! It will cause errors or unexpected behavior, as you can see in the live example below. Try hovering over the link to view the title text!
始终包含属性引号。它避免了此类问题,并产生更具可读性的代码。
¥Always include the attribute quotes. It avoids such problems, and results in more readable code.
单引号还是双引号?
¥Single or double quotes?
在本文中,你还会注意到属性用双引号括起来。但是,你可能会在某些 HTML 代码中看到单引号。这是风格问题。你可以随意选择你喜欢的一款。这两行是等效的:
¥In this article, you will also notice that the attributes are wrapped in double quotes. However, you might see single quotes in some HTML code. This is a matter of style. You can feel free to choose which one you prefer. Both of these lines are equivalent:
<a href='https://www.example.com'>A link to my example.</a>

<a href="https://www.example.com">A link to my example.</a>
确保不要混合使用单引号和双引号。这个例子(如下)显示了一种会出错的混合引用:
¥Make sure you don't mix single quotes and double quotes. This example (below) shows a kind of mixing of quotes that will go wrong:
<a href="https://www.example.com'>A link to my example.</a>
但是,如果你使用一种类型的引用,则可以在属性值中包含另一种类型的引用:
¥However, if you use one type of quote, you can include the other type of quote inside your attribute values:
<a href="https://www.example.com" title="Isn't this fun?">
  A link to my example.
</a>
要在相同类型的其他引号内使用引号(单引号或双引号),请使用 character references。例如,这会破坏:
¥To use quote marks inside other quote marks of the same type (single quote or double quote), use character references. For example, this will break:
<a href="https://www.example.com" title="An "interesting" reference">A link to my example.</a>
相反,你需要这样做:
¥Instead, you need to do this:
<a href="https://www.example.com" title="An "interesting" reference">A link to my example.</a>
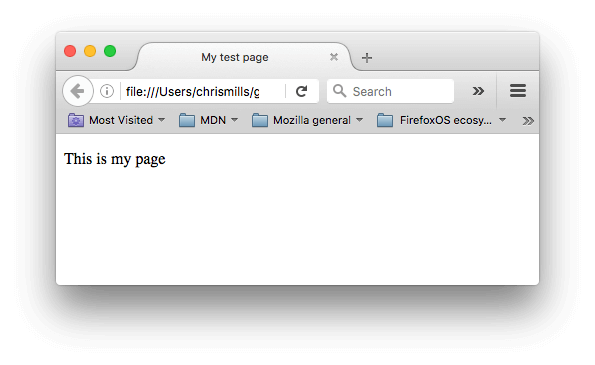
HTML 文档剖析
¥Anatomy of an HTML document
单独的 HTML 元素本身并不是很有用。接下来,我们来看看各个元素如何组合形成整个 HTML 页面:
¥Individual HTML elements aren't very useful on their own. Next, let's examine how individual elements combine to form an entire HTML page:
<!doctype html>
<html lang="en-US">
  <head>
    <meta charset="utf-8" />
    <title>My test page</title>
  </head>
  <body>
    <p>This is my page</p>
  </body>
</html>
这里我们有:
¥Here we have:
<!DOCTYPE html>:文档类型。当 HTML 还很年轻时(1991-1992 年),文档类型旨在充当一组规则的链接,HTML 页面必须遵循这些规则才能被视为良好的 HTML。文档类型过去看起来像这样:最近,文档类型是一个历史工件,需要包含它才能使其他所有内容正常工作。html<!DOCTYPE html PUBLIC "-//W3C//DTD XHTML 1.0 Transitional//EN" "http://www.w3.org/TR/xhtml1/DTD/xhtml1-transitional.dtd"><!DOCTYPE html>是算作有效文档类型的最短字符串。这就是你需要知道的全部!<html></html>:<html>元素。该元素包裹了页面上的所有内容。它有时被称为根元素。<head></head>:<head>元素。该元素充当你想要包含在 HTML 页面上的所有内容的容器,但页面不会向查看者显示内容。这包括出现在搜索结果中的关键字和页面描述、用于设置内容样式的 CSS、字符集声明等。你将在本系列的下一篇文章中了解更多相关信息。<meta charset="utf-8">:<meta>元素。该元素表示其他 HTML 元相关元素无法表示的元数据,例如<base>、<link>、<script>、<style>或<title>。charset属性将文档的字符编码指定为 UTF-8,其中包括绝大多数人类书面语言中的大多数字符。通过此设置,页面现在可以处理它可能包含的任何文本内容。没有理由不设置这个,它可以帮助避免以后出现一些问题。<title></title>:<title>元素。这设置页面的标题,即显示在加载页面的浏览器选项卡中的标题。页面标题还用于在添加书签时描述该页面。<body></body>:<body>元素。这包含页面上显示的所有内容,包括文本、图片、视频、游戏、可播放的音轨或其他内容。
主动学习:向 HTML 文档添加一些功能
¥Active learning: Adding some features to an HTML document
如果你想尝试在本地计算机上编写一些 HTML,你可以:
¥If you want to experiment with writing some HTML on your local computer, you can:
- 复制上面列出的 HTML 页面示例。
- 在文本编辑器中创建一个新文件。
- 将代码粘贴到新的文本文件中。
- 将文件另存为
index.html。
注意:你还可以在 MDN 学习区 GitHub 存储库 上找到这个基本的 HTML 模板。
¥Note: You can also find this basic HTML template on the MDN Learning Area GitHub repo.
现在,你可以在 Web 浏览器中打开此文件,查看渲染的代码是什么样子的。编辑代码并刷新浏览器以查看结果。最初,页面如下所示:
¥You can now open this file in a web browser to see what the rendered code looks like. Edit the code and refresh the browser to see what the result is. Initially, the page looks like this:
在本练习中,你可以如前所述在计算机上本地编辑代码,也可以在下面的示例窗口中编辑代码(在本例中,可编辑示例窗口仅代表 <body> 元素的内容)。通过执行以下任务来提高你的技能:
¥In this exercise, you can edit the code locally on your computer, as described previously, or you can edit it in the sample window below (the editable sample window represents just the contents of the <body> element, in this case). Sharpen your skills by implementing the following tasks:
- 在
<body>元素的开始标记下方,添加文档的主标题。它应该包含在<h1>开始标签和</h1>结束标签内。 - 编辑段落内容以包含有关你感兴趣的主题的文本。
- 将重要的单词包裹在
<strong>开始标签和</strong>结束标签内,使重要单词以粗体高亮。 - 添加指向你的段落的链接,如 文章前面已经解释过。
- 将图片添加到你的文档中。将其放在段落下方,如 文章前面已经解释过。如果你设法链接到不同的图片(无论是在你的计算机本地还是网络上的其他位置),均可获得奖励积分。
如果你犯了错误,你可以随时使用“重置”按钮进行重置。如果你确实遇到困难,请按“显示解决方案”按钮查看答案。
¥If you make a mistake, you can always reset it using the Reset button. If you get really stuck, press the Show solution button to see the answer.
<h2>Live output</h2>
<div class="output" style="min-height: 50px;"></div>
<h2>Editable code</h2>
<p class="a11y-label">
Press Esc to move focus away from the code area (Tab inserts a tab character).
</p>
<textarea id="code" class="input" style="min-height: 100px;width: 95%">
<p>This is my page</p>
</textarea>
<div class="playable-buttons">
<input id="reset" type="button" value="Reset" />
<input id="solution" type="button" value="Show solution" />
</div>
html {
  font-family: sans-serif;
}

h1 {
  color: blue;
}

h2 {
  font-size: 16px;
}

.a11y-label {
  margin: 0;
  text-align: right;
  font-size: 0.7rem;
  width: 98%;
}

img {
  max-width: 100%;
}

body {
  margin: 10px;
  background: #f5f9fa;
}
const textarea = document.getElementById("code");
const reset = document.getElementById("reset");
const solution = document.getElementById("solution");
const output = document.querySelector(".output");
const code = textarea.value;
let userEntry = textarea.value;

function updateCode() {
  output.innerHTML = textarea.value;
}

const htmlSolution =
  '<h1>Some music</h1><p>I really enjoy <strong>playing the drums</strong>. One of my favorite drummers is Neal Peart, who plays in the band <a href="https://en.wikipedia.org/wiki/Rush_%28band%29" title="Rush Wikipedia article">Rush</a>. My favorite Rush album is currently <a href="http://www.deezer.com/album/942295">Moving Pictures</a>.</p> <img src="http://www.cygnus-x1.net/links/rush/images/albums/sectors/sector2-movingpictures-cover-s.jpg" alt="Rush Moving Pictures album cover">';
let solutionEntry = htmlSolution;

reset.addEventListener("click", () => {
  textarea.value = code;
  userEntry = textarea.value;
  solutionEntry = htmlSolution;
  solution.value = "Show solution";
  updateCode();
});

solution.addEventListener("click", () => {
  if (solution.value === "Show solution") {
    textarea.value = solutionEntry;
    solution.value = "Hide solution";
  } else {
    textarea.value = userEntry;
    solution.value = "Show solution";
  }
  updateCode();
});

textarea.addEventListener("input", updateCode);
window.addEventListener("load", updateCode);

// stop tab key tabbing out of textarea and
// make it write a tab at the caret position instead

textarea.onkeydown = (e) => {
  if (e.code === "Tab") {
    e.preventDefault();
    insertAtCaret("\t");
  }

  if (e.code === "Escape") {
    textarea.blur();
  }
};

function insertAtCaret(text) {
  const scrollPos = textarea.scrollTop;
  let caretPos = textarea.selectionStart;

  const front = textarea.value.substring(0, caretPos);
  const back = textarea.value.substring(
    textarea.selectionEnd,
    textarea.value.length,
  );
  textarea.value = front + text + back;
  caretPos += text.length;
  textarea.selectionStart = caretPos;
  textarea.selectionEnd = caretPos;
  textarea.focus();
  textarea.scrollTop = scrollPos;
}

// Update the saved userCode every time the user updates the text area code
textarea.onkeyup = () => {
  // We only want to save the state when the user code is being shown,
  // not the solution, so that solution is not saved over the user code
  if (solution.value === "Show solution") {
    userEntry = textarea.value;
  } else {
    solutionEntry = textarea.value;
  }

  updateCode();
};
HTML 中的空白
¥Whitespace in HTML
在上面的示例中,你可能已经注意到代码中包含大量空格。这是可选的。这两个代码片段是等效的:
¥In the examples above, you may have noticed that a lot of whitespace is included in the code. This is optional. These two code snippets are equivalent:
<p id="noWhitespace">Dogs are silly.</p>

<p id="whitespace">Dogs
    are
        silly.</p>
无论你在 HTML 元素内容中使用多少空格(可以包含一个或多个空格字符,也可以包含换行符),HTML 解析器在呈现代码时会将每个空格序列减少为单个空格。那么为什么要使用这么多空白呢?答案是可读性。
¥No matter how much whitespace you use inside HTML element content (which can include one or more space characters, but also line breaks), the HTML parser reduces each sequence of whitespace to a single space when rendering the code. So why use so much whitespace? The answer is readability.
如果你的代码格式良好,那么你可以更轻松地理解代码中发生的情况。在我们的 HTML 中,每个嵌套元素都比它所在的元素多缩进两个空格。你可以选择格式的样式(例如,每个缩进级别有多少空格),但你应该考虑对其进行格式化。
¥It can be easier to understand what is going on in your code if you have it nicely formatted. In our HTML we've got each nested element indented by two spaces more than the one it is sitting inside. It is up to you to choose the style of formatting (how many spaces for each level of indentation, for example), but you should consider formatting it.
我们来看看浏览器如何渲染上面两段有空格和无空格的情况:
¥Let's have a look at how the browser renders the two paragraphs above with and without whitespace:
注意:从 JavaScript 访问元素的 内部 HTML 将使所有空白保持完整。如果浏览器修剪了空白,则可能会返回意外结果。
¥Note: Accessing the innerHTML of elements from JavaScript will keep all the whitespace intact. This may return unexpected results if the whitespace is trimmed by the browser.
const noWhitespace = document.getElementById("noWhitespace").innerHTML;
console.log(noWhitespace);
// "Dogs are silly."

const whitespace = document.getElementById("whitespace").innerHTML;
console.log(whitespace);
// "Dogs
//    are
//        silly."
字符引用:包括 HTML 中的特殊字符
¥Character references: including special characters in HTML
在 HTML 中,字符 <、>、"、' 和 & 是特殊字符。它们是 HTML 语法本身的一部分。那么如何在文本中包含这些特殊字符之一呢?例如,如果你想使用 & 符号或小于号,而不将其解释为代码。
¥In HTML, the characters <, >,",', and & are special characters. They are parts of the HTML syntax itself. So how do you include one of these special characters in your text? For example, if you want to use an ampersand or less-than sign, and not have it interpreted as code.
你可以使用 character references 执行此操作。这些是代表字符的特殊代码,在这些具体情况下使用。每个字符引用都以与号 (&) 开头,并以分号 (;) 结尾。
¥You do this with character references. These are special codes that represent characters, to be used in these exact circumstances. Each character reference starts with an ampersand (&), and ends with a semicolon (;).
| 文字字符 | 字符参考等效项 |
|---|---|
| < | < |
| > | > |
| " | " |
| ' | ' |
| & | & |
字符参考等效项很容易记住,因为它使用的文本可以被视为小于 <,引用为 ",其他类似。要查找有关实体引用的更多信息,请参阅 XML 和 HTML 字符实体引用列表(维基百科)。
¥The character reference equivalent could be easily remembered because the text it uses can be seen as less than for <, quotation for " and similarly for others. To find more about entity references, see List of XML and HTML character entity references (Wikipedia).
在下面的例子中,有两段:
¥In the example below, there are two paragraphs:
<p>In HTML, you define a paragraph using the <p> element.</p>
<p>In HTML, you define a paragraph using the <p> element.</p>
在下面的实时输出中,你可以看到第一段出了问题。浏览器将 <p> 的第二个实例解释为开始一个新段落。第二段看起来不错,因为它有带有字符引用的尖括号。
¥In the live output below, you can see that the first paragraph has gone wrong. The browser interprets the second instance of <p> as starting a new paragraph. The second paragraph looks fine because it has angle brackets with character references.
注意:你不需要对任何其他符号使用实体引用,因为只要你的 HTML 的 字符编码设置为 UTF-8.0 是现代浏览器就可以很好地处理实际符号。
¥Note: You don't need to use entity references for any other symbols, as modern browsers will handle the actual symbols just fine as long as your HTML's character encoding is set to UTF-8.
HTML 注释
¥HTML comments
HTML 有一种在代码中编写注释的机制。浏览器会忽略注释,从而有效地使用户看不到注释。注释的目的是允许你在代码中添加注释来解释你的逻辑或编码。如果你离开代码库太久而无法完全记住它,那么这将非常有用。同样,随着不同的人做出改变和更新,评论也是无价的。
¥HTML has a mechanism to write comments in the code. Browsers ignore comments, effectively making comments invisible to the user. The purpose of comments is to allow you to include notes in the code to explain your logic or coding. This is very useful if you return to a code base after being away for long enough that you don't completely remember it. Likewise, comments are invaluable as different people are making changes and updates.
要编写 HTML 注释,请将其包含在特殊标记 <!-- 和 --> 中。例如:
¥To write an HTML comment, wrap it in the special markers <!-- and -->. For example:
<p>I'm not inside a comment</p>

<!-- <p>I am!</p> -->
如下所示,实时输出中仅显示第一段。
¥As you can see below, only the first paragraph is displayed in the live output.
概括
¥Summary
你已完成文章的结尾!我们希望你喜欢 HTML 基础知识的学习。
¥You made it to the end of the article! We hope you enjoyed your tour of the basics of HTML.
此时,你应该了解 HTML 是什么样子,以及它在基本层面上是如何工作的。你还应该能够编写一些元素和属性。本模块的后续文章将进一步讨论此处介绍的一些主题,并介绍该语言的其他概念。
¥At this point, you should understand what HTML looks like, and how it works at a basic level. You should also be able to write a few elements and attributes. The subsequent articles of this module go further on some of the topics introduced here, as well as presenting other concepts of the language.
- 当你开始了解有关 HTML 的更多信息时,请考虑学习 CSS(层叠样式表)的基础知识。CSS 是用于设计网页样式的语言,例如更改字体或颜色或更改页面布局。你很快就会发现,HTML 和 CSS 可以很好地协同工作。
也可以看看
¥See also