将矢量图形添加到网络
矢量图形在许多情况下都非常有用 - 它们的文件大小很小并且具有高度可扩展性,因此在放大或放大到大尺寸时它们不会像素化。在本文中,我们将向你展示如何将其包含在你的网页中。
¥Vector graphics are very useful in many circumstances — they have small file sizes and are highly scalable, so they don't pixelate when zoomed in or blown up to a large size. In this article we'll show you how to include one in your webpage.
| 先决条件: | 你应该了解 HTML 基础知识 以及如何使用 将图片插入到你的文档中。 |
|---|---|
| 目标: | 了解如何将 SVG(矢量)图片嵌入网页中。 |
注意:本文无意教你 SVG;而是要教你如何使用 SVG。它是什么,以及如何将其添加到网页。
¥Note: This article doesn't intend to teach you SVG; just what it is, and how to add it to web pages.
什么是矢量图形?
¥What are vector graphics?
在网络上,你将使用两种类型的图片 - 光栅图片和矢量图片:
¥On the web, you'll work with two types of images — raster images, and vector images:
- 光栅图片是使用像素网格定义的 - 光栅图片文件包含准确显示每个像素的放置位置以及它应该是什么颜色的信息。流行的 Web 栅格格式包括位图 (
.bmp)、PNG (.png)、JPEG (.jpg) 和 GIF (.gif)。 - 矢量图片是使用算法定义的 - 矢量图片文件包含形状和路径定义,计算机可以使用它们来计算图片在屏幕上渲染时的外观。SVG 格式允许我们创建强大的矢量图形以在 Web 上使用。
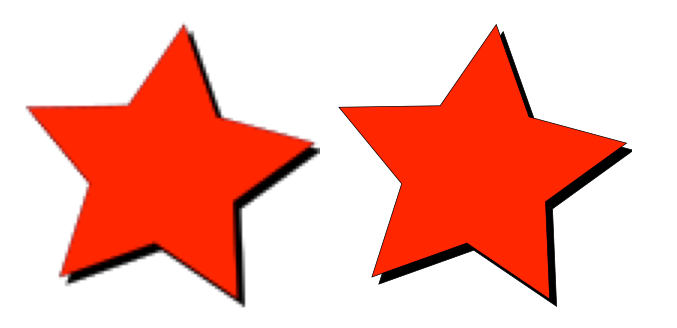
为了让你了解两者之间的区别,让我们看一个示例。你可以在我们的 GitHub 存储库中找到这个示例,名称为 vector-versus-raster.html — 它并排显示了两个看似相同的图片,其中是一颗带有黑色投影的红星。不同的是,左边是 PNG 图片,右边是 SVG 图片。
¥To give you an idea of the difference between the two, let's look at an example. You can find this example live on our GitHub repo as vector-versus-raster.html — it shows two seemingly identical images side by side, of a red star with a black drop shadow. The difference is that the left one is a PNG, and the right one is an SVG image.
当你放大页面时,差异就会变得明显 - 当你放大时,PNG 图片会变得像素化,因为它包含有关每个像素应该在哪里(以及什么颜色)的信息。缩放时,每个像素的尺寸都会增加以填充屏幕上的多个像素,因此图片开始看起来呈块状。然而,矢量图片仍然看起来漂亮、清晰,因为无论它的大小是多少,算法都会用来计算图片中的形状,随着图片变大,值也会被缩放。
¥The difference becomes apparent when you zoom in the page — the PNG image becomes pixelated as you zoom in because it contains information on where each pixel should be (and what color). When it is zoomed, each pixel is increased in size to fill multiple pixels on screen, so the image starts to look blocky. The vector image however continues to look nice and crisp, because no matter what size it is, the algorithms are used to work out the shapes in the image, with the values being scaled as it gets bigger.


注意:上面的图片实际上都是 PNG,左边的星星代表光栅图片,右边的星星代表矢量图片。再次,请前往 vector-versus-raster.html 演示查看真实示例!
¥Note: The images above are actually all PNGs — with the left-hand star in each case representing a raster image, and the right-hand star representing a vector image. Again, go to the vector-versus-raster.html demo for a real example!
此外,矢量图片文件比光栅文件要轻得多,因为它们只需要保存少量算法,而不需要单独保存图片中每个像素的信息。
¥Moreover, vector image files are much lighter than their raster equivalents, because they only need to hold a handful of algorithms, rather than information on every pixel in the image individually.
什么是 SVG?
¥What is SVG?
SVG 是一种基于 XML 的语言,用于描述矢量图片。它基本上是标记,就像 HTML 一样,只不过你有许多不同的元素来定义要在图片中显示的形状,以及要应用于这些形状的效果。SVG 用于标记图形,而不是内容。SVG 定义了用于创建基本形状(如 <circle> 和 <rect>)的元素,以及用于创建更复杂形状(如 <path> 和 <polygon>)的元素。更高级的 SVG 功能包括 <feColorMatrix>(使用变换矩阵变换颜色)、<animate>(矢量图形的动画部分)和 <mask>(在图片顶部应用蒙版)。
¥SVG is an XML-based language for describing vector images. It's basically markup, like HTML, except that you've got many different elements for defining the shapes you want to appear in your image, and the effects you want to apply to those shapes. SVG is for marking up graphics, not content. SVG defines elements for creating basic shapes, like <circle> and <rect>, as well as elements for creating more complex shapes, like <path> and <polygon>. More advanced SVG features include <feColorMatrix> (transform colors using a transformation matrix), <animate> (animate parts of your vector graphic), and <mask> (apply a mask over the top of your image).
作为一个基本示例,以下代码创建一个圆形和一个矩形:
¥As a basic example, the following code creates a circle and a rectangle:
<svg
  version="1.1"
  baseProfile="full"
  width="300"
  height="200"
  xmlns="http://www.w3.org/2000/svg">
  <rect width="100%" height="100%" fill="black" />
  <circle cx="150" cy="100" r="90" fill="blue" />
</svg>
这将创建以下输出:
¥This creates the following output:
从上面的示例中,你可能会觉得 SVG 代码很容易编写。是的,你可以在文本编辑器中手动编写简单的 SVG 代码,但对于复杂的图片,这很快就会变得非常困难。为了创建 SVG 图片,大多数人使用矢量图形编辑器,例如 墨景 或 插画家。这些包允许你使用各种图形工具创建各种插图,并创建照片的近似值(例如 Inkscape 的跟踪位图功能。)
¥From the example above, you may get the impression that SVG is easy to hand code. Yes, you can hand code simple SVG in a text editor, but for a complex image this quickly starts to get very difficult. For creating SVG images, most people use a vector graphics editor like Inkscape or Illustrator. These packages allow you to create a variety of illustrations using various graphics tools, and create approximations of photos (for example Inkscape's Trace Bitmap feature.)
除了目前描述的优点之外,SVG 还有一些额外的优点:
¥SVG has some additional advantages besides those described so far:
- 矢量图片中的文本仍然可以访问(这也有利于你的 SEO)。
- SVG 非常适合样式/脚本编写,因为图片的每个组件都是可以通过 CSS 设置样式或通过 JavaScript 编写脚本的元素。
那么为什么有人想要使用光栅图形而不是 SVG 呢?嗯,SVG 确实有一些缺点:
¥So why would anyone want to use raster graphics over SVG? Well, SVG does have some disadvantages:
- SVG 很快就会变得复杂,这意味着文件大小会增大;复杂的 SVG 也会在浏览器中花费大量的处理时间。
- SVG 可能比光栅图片更难创建,具体取决于你要创建的图片类型。
出于上述原因,光栅图形可以说更适合复杂的精确图片(例如照片)。
¥Raster graphics are arguably better for complex precision images such as photos, for the reasons described above.
注意:在 Inkscape 中,将文件另存为纯 SVG 以节省空间。另外,请参阅此 描述如何为 Web 准备 SVG 的文章。
¥Note: In Inkscape, save your files as Plain SVG to save space. Also, please refer to this article describing how to prepare SVGs for the Web.
将 SVG 添加到你的页面
快速方法:img 元素
¥The quick way: img element
要通过 <img> 元素嵌入 SVG,你只需按照预期在 src 属性中引用它即可。你将需要 height 或 width 属性(如果你的 SVG 没有固有的 aspect ratio,则需要两者)。如果你还没有这样做,请阅读 HTML 中的图片。
¥To embed an SVG via an <img> element, you just need to reference it in the src attribute as you'd expect. You will need a height or a width attribute (or both if your SVG has no inherent aspect ratio). If you have not already done so, please read Images in HTML.
<img
  src="equilateral.svg"
  alt="triangle with all three sides equal"
  height="87"
  width="100" />
优点
¥Pros
- 快速、熟悉的图片语法以及
alt属性中提供的内置文本等效项。 - 通过将
<img>嵌套在<a>元素内,你可以轻松地将图片变成超链接。 - SVG 文件可以由浏览器缓存,从而使将来使用该图片的任何页面的加载时间更快。
缺点
¥Cons
- 你无法使用 JavaScript 操作图片。
- 如果你想使用 CSS 控制 SVG 内容,则必须在 SVG 代码中包含内联 CSS 样式。(从 SVG 文件调用的外部样式表无效。)
- 你无法使用 CSS 伪类(如
:focus)重新设置图片的样式。
故障排除和跨浏览器支持
¥Troubleshooting and cross-browser support
对于不支持 SVG 的浏览器(IE 8 及更低版本、Android 2.3 及更低版本),你可以从 src 属性引用 PNG 或 JPG,并使用 srcset 属性(只有最新的浏览器识别)来引用 SVG。在这种情况下,只有支持的浏览器才会加载 SVG — 较旧的浏览器将加载 PNG:
¥For browsers that don't support SVG (IE 8 and below, Android 2.3 and below), you could reference a PNG or JPG from your src attribute and use a srcset attribute (which only recent browsers recognize) to reference the SVG. This being the case, only supporting browsers will load the SVG — older browsers will load the PNG instead:
<img
  src="equilateral.png"
  alt="triangle with equal sides"
  srcset="equilateral.svg" />
你还可以使用 SVG 作为 CSS 背景图片,如下所示。在下面的代码中,较旧的浏览器将坚持使用它们理解的 PNG,而较新的浏览器将加载 SVG:
¥You can also use SVGs as CSS background images, as shown below. In the below code, older browsers will stick with the PNG that they understand, while newer browsers will load the SVG:
background: url("fallback.png") no-repeat center;
background-image: url("image.svg");
background-size: contain;
与上述 <img> 方法类似,使用 CSS 背景图片插入 SVG 意味着 SVG 无法使用 JavaScript 进行操作,并且也受到相同的 CSS 限制。
¥Like the <img> method described above, inserting SVGs using CSS background images means that the SVG can't be manipulated with JavaScript, and is also subject to the same CSS limitations.
如果你的 SVG 根本没有显示,可能是因为你的服务器设置不正确。如果这就是问题所在,那么这个 文章将为你指明正确的方向。
¥If your SVGs aren't showing up at all, it might be because your server isn't set up properly. If that's the problem, this article will point you in the right direction.
如何在 HTML 中包含 SVG 代码
¥How to include SVG code inside your HTML
你还可以在文本编辑器中打开 SVG 文件,复制 SVG 代码,然后将其粘贴到 HTML 文档中 - 这有时称为将 SVG 内联或内联 SVG。确保你的 SVG 代码片段以 <svg> 开始标记开头并以 </svg> 结束标记结束。以下是你可以粘贴到文档中的内容的一个非常简单的示例:
¥You can also open up the SVG file in a text editor, copy the SVG code, and paste it into your HTML document — this is sometimes called putting your SVG inline, or inlining SVG. Make sure your SVG code snippet begins with an <svg> start tag and ends with an </svg> end tag. Here's a very simple example of what you might paste into your document:
<svg width="300" height="200">
  <rect width="100%" height="100%" fill="green" />
</svg>
优点
¥Pros
- 将 SVG 内联可以节省 HTTP 请求,因此可以稍微减少加载时间。
- 你可以将
classes 和id分配给 SVG 元素,并使用 CSS 对其进行样式设置,无论是在 SVG 内还是在 HTML 文档中放置 CSS 样式规则的任何位置。事实上,你可以使用任何 SVG 呈现属性 作为 CSS 属性。 - 内联 SVG 是唯一允许你在 SVG 图片上使用 CSS 交互(如
:focus)和 CSS 动画(甚至在常规样式表中)的方法。 - 你可以通过将 SVG 标记封装在
<a>元素中将其制作为超链接。
缺点
¥Cons
- 此方法仅适用于仅在一处使用 SVG 的情况。重复导致资源密集型维护。
- 额外的 SVG 代码会增加 HTML 文件的大小。
- 浏览器无法缓存内联 SVG,因为它会缓存常规图片资源,因此在加载包含图片的第一个页面后,包含图片的页面将不会加载得更快。
- 你可以在
<foreignObject>元素中包含后备图片,但支持 SVG 的浏览器仍会下载任何后备图片。你需要权衡额外的开销是否真的值得,只是为了支持过时的浏览器。
如何使用 iframe 嵌入 SVG
¥How to embed an SVG with an iframe
你可以像网页一样在浏览器中打开 SVG 图片。因此,使用 <iframe> 嵌入 SVG 文档就像我们在 从 <object> 到 <iframe> — 其他嵌入技术 中学习的那样。
¥You can open SVG images in your browser just like webpages. So embedding an SVG document with an <iframe> is done just like we studied in From <object> to <iframe> — other embedding technologies.
这是一个快速回顾:
¥Here's a quick review:
<iframe src="triangle.svg" width="500" height="500" sandbox>
  <img src="triangle.png" alt="Triangle with three unequal sides" />
</iframe>
这绝对不是最好的选择方法:
¥This is definitely not the best method to choose:
缺点
¥Cons
- 正如你所看到的,
iframe确实有一个后备机制,但浏览器仅在完全不支持iframe时才显示后备机制。 - 此外,除非 SVG 和你当前的网页具有相同的 origin,否则你无法在主网页上使用 JavaScript 来操作 SVG。
主动学习:玩转 SVG
¥Active Learning: Playing with SVG
在这个主动学习部分中,我们希望你尝试使用一些 SVG 来获得乐趣。在下面的输入部分中,你将看到我们已经为你提供了一些示例来帮助你入门。你还可以访问 SVG 元素参考,了解有关可在 SVG 中使用的其他玩具的更多详细信息,并也尝试一下。这一部分主要是为了练习你的研究技能,并享受一些乐趣。
¥In this active learning section we'd like you to have a go at playing with some SVG for fun. In the Input section below you'll see that we've already provided you with some samples to get you started. You can also go to the SVG Element Reference, find out more details about other toys you can use in SVG, and try those out too. This section is all about practising your research skills, and having some fun.
如果你遇到困难并且无法使代码正常工作,你可以随时使用“重置”按钮重置它。
¥If you get stuck and can't get your code working, you can always reset it using the Reset button.
<h2>Live output</h2>

<div class="output" style="min-height: 50px;"></div>

<h2>Editable code</h2>
<p class="a11y-label">
  Press Esc to move focus away from the code area (Tab inserts a tab character).
</p>

<textarea id="code" class="input" style="width: 95%;min-height: 200px;">
  <svg width="100%" height="100%">
    <rect width="100%" height="100%" fill="red" />
    <circle cx="100%" cy="100%" r="150" fill="blue" stroke="black" />
    <polygon points="120,0 240,225 0,225" fill="green"/>
    <text x="50" y="100" font-family="Verdana" font-size="55"
          fill="white" stroke="black" stroke-width="2">
            Hello!
    </text>
  </svg>
</textarea>

<div class="playable-buttons">
  <input id="reset" type="button" value="Reset" />
  <input id="solution" type="button" value="Show solution" disabled />
</div>
html {
  font-family: sans-serif;
}

h2 {
  font-size: 16px;
}

.a11y-label {
  margin: 0;
  text-align: right;
  font-size: 0.7rem;
  width: 98%;
}

body {
  margin: 10px;
  background: #f5f9fa;
}
const textarea = document.getElementById("code");
const reset = document.getElementById("reset");
const solution = document.getElementById("solution");
const output = document.querySelector(".output");
let code = textarea.value;
let userEntry = textarea.value;

function updateCode() {
  output.innerHTML = textarea.value;
}

reset.addEventListener("click", function () {
  textarea.value = code;
  userEntry = textarea.value;
  solutionEntry = htmlSolution;
  solution.value = "Show solution";
  updateCode();
});

solution.addEventListener("click", function () {
  if (solution.value === "Show solution") {
    textarea.value = solutionEntry;
    solution.value = "Hide solution";
  } else {
    textarea.value = userEntry;
    solution.value = "Show solution";
  }
  updateCode();
});

const htmlSolution = "";
let solutionEntry = htmlSolution;

textarea.addEventListener("input", updateCode);
window.addEventListener("load", updateCode);

// stop tab key tabbing out of textarea and
// make it write a tab at the caret position instead

textarea.onkeydown = function (e) {
  if (e.code === "Tab") {
    e.preventDefault();
    insertAtCaret("\t");
  }

  if (e.code === "Escape") {
    textarea.blur();
  }
};

function insertAtCaret(text) {
  const scrollPos = textarea.scrollTop;
  let caretPos = textarea.selectionStart;
  const front = textarea.value.substring(0, caretPos);
  const back = textarea.value.substring(
    textarea.selectionEnd,
    textarea.value.length,
  );

  textarea.value = front + text + back;
  caretPos += text.length;
  textarea.selectionStart = caretPos;
  textarea.selectionEnd = caretPos;
  textarea.focus();
  textarea.scrollTop = scrollPos;
}

// Update the saved userCode every time the user updates the text area code

textarea.onkeyup = function () {
  // We only want to save the state when the user code is being shown,
  // not the solution, so that solution is not saved over the user code
  if (solution.value === "Show solution") {
    userEntry = textarea.value;
  } else {
    solutionEntry = textarea.value;
  }

  updateCode();
};
概括
¥Summary
本文让你快速浏览了什么是矢量图形和 SVG、为什么了解它们很有用以及如何将 SVG 包含在网页中。它从来都不是学习 SVG 的完整指南,只是一个指针,以便你在网络旅行中遇到 SVG 时知道它是什么。因此,如果你觉得自己还不是 SVG 专家,请不要担心。如果你想了解有关其工作原理的更多信息,我们在下面提供了一些链接,这些链接可能会对你有所帮助。
¥This article has provided you with a quick tour of what vector graphics and SVG are, why they are useful to know about, and how to include SVG inside your webpages. It was never intended to be a full guide to learning SVG, just a pointer so you know what SVG is if you meet it in your travels around the Web. So don't worry if you don't feel like you are an SVG expert yet. We've included some links below that might help you if you wish to go and find out more about how it works.
在本模块的最后一篇文章中,我们将详细探讨 响应式图片,了解 HTML 所拥有的工具,使你的图片能够在不同的设备上更好地工作。
¥In the last article of this module, we'll explore responsive images in detail, looking at the tools HTML has to allow you to make your images work better across different devices.
也可以看看
¥See also
- MDN 上的 SVG 教程
- Sara Soueidan 的响应式 SVG 图片教程
- SVG 的辅助功能优势
- SVG 属性和 CSS
- 如何缩放 SVG(它不像光栅图形那么简单!)