处理文档
在编写网页和应用时,你最常见的事情之一就是以某种方式操纵文档结构。这通常通过使用文档对象模型 (DOM) 来完成,这是一组用于控制大量使用 Document 对象的 HTML 和样式信息的 API。在本文中,我们将详细介绍如何使用 DOM,以及一些其他有趣的 API,它们可以以有趣的方式改变你的环境。
¥When writing web pages and apps, one of the most common things you'll want to do is manipulate the document structure in some way. This is usually done by using the Document Object Model (DOM), a set of APIs for controlling HTML and styling information that makes heavy use of the Document object. In this article we'll look at how to use the DOM in detail, along with some other interesting APIs that can alter your environment in interesting ways.
| 先决条件: | 对 HTML、CSS 和 JavaScript(包括 JavaScript 对象)有基本的了解。 |
|---|---|
| 目标: | 熟悉核心 DOM API 以及通常与 DOM 和文档操作相关的其他 API。 |
网络浏览器的重要部分
¥The important parts of a web browser
Web 浏览器是非常复杂的软件,具有许多移动部件,其中许多部件无法由使用 JavaScript 的 Web 开发者控制或操作。你可能认为这种限制是一件坏事,但浏览器被锁定是有充分理由的,主要是围绕安全性。想象一下,如果一个网站可以访问你存储的密码或其他敏感信息,并像你一样登录网站,会怎样?
¥Web browsers are very complicated pieces of software with a lot of moving parts, many of which can't be controlled or manipulated by a web developer using JavaScript. You might think that such limitations are a bad thing, but browsers are locked down for good reasons, mostly centering around security. Imagine if a website could get access to your stored passwords or other sensitive information, and log into websites as if it were you?
尽管有这些限制,Web API 仍然使我们能够访问许多功能,使我们能够使用网页执行许多操作。你将在代码中定期引用一些非常明显的位 - 考虑下图,它表示直接参与查看网页的浏览器的主要部分:
¥Despite the limitations, Web APIs still give us access to a lot of functionality that enable us to do a great many things with web pages. There are a few really obvious bits you'll reference regularly in your code — consider the following diagram, which represents the main parts of a browser directly involved in viewing web pages:
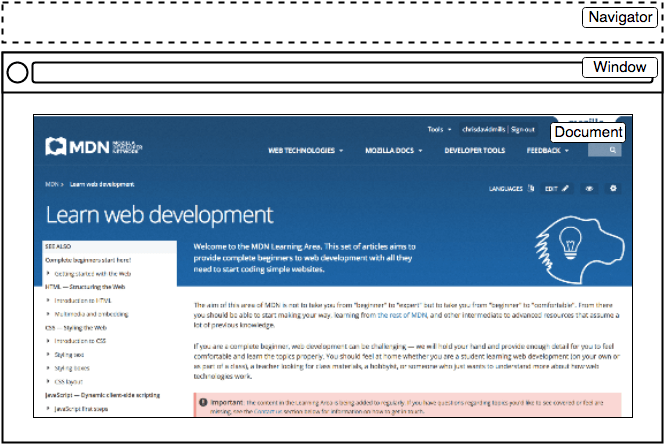
- 窗口是网页加载到的浏览器选项卡;这在 JavaScript 中由
Window对象表示。使用此对象上可用的方法,你可以执行诸如返回窗口大小(请参阅Window.innerWidth和Window.innerHeight)、操作加载到该窗口中的文档、在客户端存储特定于该文档的数据(例如使用本地数据库或其他数据库)等操作。 存储机制)、将 事件处理程序 附加到当前窗口等等。 - 导航器代表浏览器(即用户代理)存在于网络上的状态和身份。在 JavaScript 中,这由
Navigator对象表示。你可以使用此对象来检索用户的首选语言、来自用户网络摄像头的媒体流等内容。 - 文档(在浏览器中由 DOM 表示)是加载到窗口中的实际页面,在 JavaScript 中由
Document对象表示。你可以使用此对象返回和操作有关包含文档的 HTML 和 CSS 的信息,例如获取对 DOM 中元素的引用、更改其文本内容、对其应用新样式、创建新元素并将它们添加到 当前元素作为子元素,甚至完全删除它。
在本文中,我们将主要关注文档的操作,但除此之外我们还将展示一些其他有用的内容。
¥In this article we'll focus mostly on manipulating the document, but we'll show a few other useful bits besides.
文档对象模型
¥The document object model
当前在每个浏览器选项卡中加载的文档由文档对象模型表示。这是由浏览器创建的 "树结构" 表示形式,使编程语言可以轻松访问 HTML 结构 - 例如,浏览器本身在呈现页面时使用它来将样式和其他信息应用到正确的元素,像你这样的开发者可以 页面渲染后,使用 JavaScript 操作 DOM。
¥The document currently loaded in each one of your browser tabs is represented by a document object model. This is a "tree structure" representation created by the browser that enables the HTML structure to be easily accessed by programming languages — for example the browser itself uses it to apply styling and other information to the correct elements as it renders a page, and developers like you can manipulate the DOM with JavaScript after the page has been rendered.
我们在 dom-example.html (也看到它直播) 创建了一个简单的示例页面。尝试在浏览器中打开它 - 这是一个非常简单的页面,其中包含 <section> 元素,你可以在其中找到图片,以及内部带有链接的段落。HTML 源代码如下所示:
¥We have created a simple example page at dom-example.html (see it live also). Try opening this up in your browser — it is a very simple page containing a <section> element inside which you can find an image, and a paragraph with a link inside. The HTML source code looks like this:
<!doctype html>
<html lang="en-US">
  <head>
    <meta charset="utf-8" />
    <title>Simple DOM example</title>
  </head>
  <body>
    <section>
      <img
        src="dinosaur.png"
        alt="A red Tyrannosaurus Rex: A two legged dinosaur standing upright like a human, with small arms, and a large head with lots of sharp teeth." />
      <p>
        Here we will add a link to the
        <a href="https://www.mozilla.org/">Mozilla homepage</a>
      </p>
    </section>
  </body>
</html>
另一方面,DOM 看起来像这样:
¥The DOM on the other hand looks like this:
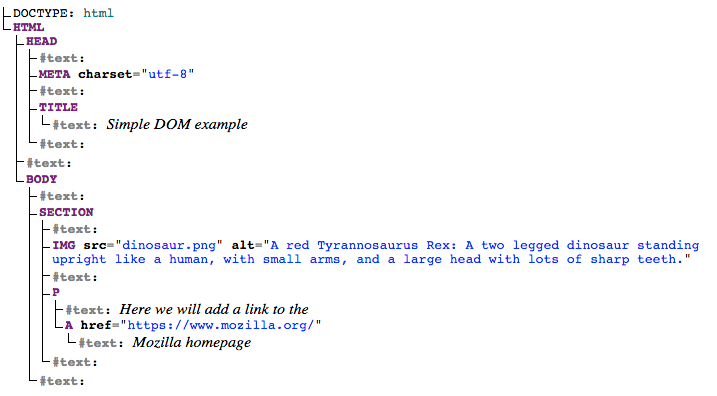
注意:此 DOM 树图是使用 Ian Hickson 的 实时 DOM 查看器 创建的。
¥Note: This DOM tree diagram was created using Ian Hickson's Live DOM viewer.
树中的每个条目称为一个节点。你可以在上图中看到,一些节点代表元素(标识为 HTML、HEAD、META 等),其他节点代表文本(标识为 #text)。有 其他类型的节点也是如此 个,但这些是你将遇到的主要的。
¥Each entry in the tree is called a node. You can see in the diagram above that some nodes represent elements (identified as HTML, HEAD, META and so on) and others represent text (identified as #text). There are other types of nodes as well, but these are the main ones you'll encounter.
节点也通过它们在树中相对于其他节点的位置来引用:
¥Nodes are also referred to by their position in the tree relative to other nodes:
- 根节点:树中的顶部节点,在 HTML 的情况下始终是
HTML节点(其他标记词汇表,如 SVG 和自定义 XML 将具有不同的根元素)。 - 子节点:一个节点直接位于另一个节点内部。例如,在上例中,
IMG是SECTION的子项。 - 后代节点:一个节点位于另一个节点内的任意位置。例如,上例中
IMG是SECTION的子级,也是后代。IMG不是BODY的子级,因为它在树中比BODY低两级,但它是BODY的后代。 - 父节点:一个节点内有另一个节点。例如,上例中
BODY是SECTION的父节点。 - 兄弟节点:位于 DOM 树中同一级别的节点。例如,上例中的
IMG和P是兄弟姐妹。
在使用 DOM 之前熟悉这些术语很有用,因为你将遇到的许多代码术语都使用它们。如果你学习过 CSS,你可能也遇到过它们(例如后代选择器、子选择器)。
¥It is useful to familiarize yourself with this terminology before working with the DOM, as a number of the code terms you'll come across make use of them. You may have also come across them if you have studied CSS (e.g. descendant selector, child selector).
主动学习:基本 DOM 操作
¥Active learning: Basic DOM manipulation
要开始学习 DOM 操作,让我们从一个实际示例开始。
¥To start learning about DOM manipulation, let's begin with a practical example.
- 获取 dom-example.html 页面 和随附的 image 的本地副本。
- 在结束
</body>标记上方添加<script></script>元素。 - 要操作 DOM 中的元素,首先需要选择它并将对其的引用存储在变量中。在脚本元素内,添加以下行:
js
const link = document.querySelector("a"); - 现在我们将元素引用存储在变量中,我们可以开始使用它可用的属性和方法来操作它(这些是在
<a>元素的HTMLAnchorElement等接口上定义的,其更通用的父接口HTMLElement和Node— 其中 表示 DOM 中的所有节点)。首先,我们通过更新Node.textContent属性的值来更改链接内的文本。在上一行下方添加以下行:jslink.textContent = "Mozilla Developer Network"; - 我们还应该更改链接指向的 URL,以便单击时不会转到错误的位置。再次在底部添加以下行:
js
link.href = "https://web.nodejs.cn";
请注意,与 JavaScript 中的许多事情一样,有多种方法可以选择元素并将对其的引用存储在变量中。Document.querySelector() 是推荐的现代方法。它很方便,因为它允许你使用 CSS 选择器来选择元素。上述 querySelector() 调用将匹配文档中出现的第一个 <a> 元素。如果你想匹配多个元素并对多个元素执行操作,可以使用 Document.querySelectorAll(),它匹配文档中与选择器匹配的每个元素,并将对它们的引用存储在名为 NodeList 的类似 array 的对象中。
¥Note that, as with many things in JavaScript, there are many ways to select an element and store a reference to it in a variable. Document.querySelector() is the recommended modern approach. It is convenient because it allows you to select elements using CSS selectors. The above querySelector() call will match the first <a> element that appears in the document. If you wanted to match and do things to multiple elements, you could use Document.querySelectorAll(), which matches every element in the document that matches the selector, and stores references to them in an array-like object called a NodeList.
有一些较旧的方法可用于获取元素引用,例如:
¥There are older methods available for grabbing element references, such as:
Document.getElementById(),它选择具有给定id属性值的元素,例如<p id="myId">My paragraph</p>。ID 作为参数传递给函数,即const elementRef = document.getElementById('myId')。Document.getElementsByTagName(),它返回一个类似数组的对象,包含页面上给定类型的所有元素,例如<p>、<a>等。元素类型作为参数传递给函数,即const elementRefArray = document.getElementsByTagName('p')。
这两种方法在较旧的浏览器中比 querySelector() 等现代方法工作得更好,但不太方便。看看你还能找到什么!
¥These two work better in older browsers than the modern methods like querySelector(), but are not as convenient. Have a look and see what others you can find!
创建并放置新节点
¥Creating and placing new nodes
上面的内容已经让你初步了解了可以做什么,但让我们更进一步看看如何创建新元素。
¥The above has given you a little taste of what you can do, but let's go further and look at how we can create new elements.
- 回到当前的示例,让我们首先获取对
<section>元素的引用 - 在现有脚本的底部添加以下代码(对其他行也执行相同的操作):jsconst sect = document.querySelector("section"); - 现在让我们使用
Document.createElement()创建一个新段落,并以与之前相同的方式为其提供一些文本内容:jsconst para = document.createElement("p"); para.textContent = "We hope you enjoyed the ride."; - 你现在可以使用
Node.appendChild()在该部分的末尾附加新段落:jssect.appendChild(para); - 最后,对于这一部分,让我们向链接所在的段落添加一个文本节点,以很好地完善句子。首先我们将使用
Document.createTextNode()创建文本节点:jsconst text = document.createTextNode( " — the premier source for web development knowledge.", ); - 现在我们将获取对链接所在段落的引用,并将文本节点附加到其中:
js
const linkPara = document.querySelector("p");
linkPara.appendChild(text);
这就是向 DOM 添加节点所需的大部分内容 — 在构建动态界面时,你将大量使用这些方法(稍后我们将查看一些示例)。
¥That's most of what you need for adding nodes to the DOM — you'll make a lot of use of these methods when building dynamic interfaces (we'll look at some examples later).
移动和删除元素
¥Moving and removing elements
有时你可能想要移动节点,或者将它们从 DOM 中完全删除。这是完全有可能的。
¥There may be times when you want to move nodes, or delete them from the DOM altogether. This is perfectly possible.
如果我们想将带有链接的段落移动到该部分的底部,我们可以这样做:
¥If we wanted to move the paragraph with the link inside it to the bottom of the section, we could do this:
sect.appendChild(linkPara);
这会将段落向下移动到该部分的底部。你可能认为它会制作第二份副本,但事实并非如此 - linkPara 是对该段落的唯一副本的引用。如果你想复制并添加它,则需要使用 Node.cloneNode()。
¥This moves the paragraph down to the bottom of the section. You might have thought it would make a second copy of it, but this is not the case — linkPara is a reference to the one and only copy of that paragraph. If you wanted to make a copy and add that as well, you'd need to use Node.cloneNode() instead.
删除节点也非常简单,至少当你拥有对要删除的节点及其父节点的引用时。在我们当前的例子中,我们只使用 Node.removeChild(),如下所示:
¥Removing a node is pretty simple as well, at least when you have a reference to the node to be removed and its parent. In our current case, we just use Node.removeChild(), like this:
sect.removeChild(linkPara);
当你想要仅基于对自身的引用来删除节点时(这很常见),你可以使用 Element.remove():
¥When you want to remove a node based only on a reference to itself, which is fairly common, you can use Element.remove():
linkPara.remove();
旧版浏览器不支持此方法。他们没有方法告诉节点自行删除,因此你必须执行以下操作。
¥This method is not supported in older browsers. They have no method to tell a node to remove itself, so you'd have to do the following.
linkPara.parentNode.removeChild(linkPara);
尝试将以上行添加到你的代码中。
¥Have a go at adding the above lines to your code.
操纵样式
¥Manipulating styles
可以通过 JavaScript 以多种方式操作 CSS 样式。
¥It is possible to manipulate CSS styles via JavaScript in a variety of ways.
首先,你可以使用 Document.stylesheets 获取附加到文档的所有样式表的列表,该列表返回带有 CSSStyleSheet 对象的类似数组的对象。然后你可以根据需要添加/删除样式。然而,我们不会扩展这些功能,因为它们是一种有点过时且难以操纵样式的方法。还有更简单的方法。
¥To start with, you can get a list of all the stylesheets attached to a document using Document.stylesheets, which returns an array-like object with CSSStyleSheet objects. You can then add/remove styles as wished. However, we're not going to expand on those features because they are a somewhat archaic and difficult way to manipulate style. There are much easier ways.
第一种方法是将内联样式直接添加到要动态设置样式的元素上。这是通过 HTMLElement.style 属性完成的,该属性包含文档中每个元素的内联样式信息。你可以设置该对象的属性来直接更新元素样式。
¥The first way is to add inline styles directly onto elements you want to dynamically style. This is done with the HTMLElement.style property, which contains inline styling information for each element in the document. You can set properties of this object to directly update element styles.
- 例如,尝试将这些行添加到我们正在进行的示例中:
js
para.style.color = "white"; para.style.backgroundColor = "black"; para.style.padding = "10px"; para.style.width = "250px"; para.style.textAlign = "center"; - 重新加载页面,你将看到样式已应用于该段落。如果你查看浏览器的 页面检查器/DOM 检查器 中的该段落,你会发现这些行确实向文档添加了内联样式:
html
<p
  style="color: white; background-color: black; padding: 10px; width: 250px; text-align: center;">
  We hope you enjoyed the ride.
</p>
注意:请注意 CSS 样式的 JavaScript 属性版本是如何用 lower camel case 编写的,而 CSS 版本是用连字符连接的 (kebab-case)(例如
backgroundColor与background-color)。确保不要将它们混淆,否则将无法工作。¥Note: Notice how the JavaScript property versions of the CSS styles are written in lower camel case whereas the CSS versions are hyphenated (kebab-case) (e.g.
backgroundColorversusbackground-color). Make sure you don't get these mixed up, otherwise it won't work.
还有另一种动态操作文档样式的常见方法,我们现在将介绍它。
¥There is another common way to dynamically manipulate styles on your document, which we'll look at now.
- 删除之前添加到 JavaScript 的五行。
- 在 HTML
<head>中添加以下内容:html<style> .highlight { color: white; background-color: black; padding: 10px; width: 250px; text-align: center; } </style> - 现在我们将转向一个非常有用的一般 HTML 操作方法 -
Element.setAttribute()- 它需要两个参数,你想要在元素上设置的属性,以及你想要将其设置为的值。在这种情况下,我们将在我们的段落上设置一个高亮的类名:jspara.setAttribute("class", "highlight"); - 刷新你的页面,你将看到没有任何变化 - CSS 仍然应用于该段落,但这次给它一个由我们的 CSS 规则选择的类,而不是作为内联 CSS 样式。
选择哪种方法取决于你;两者都有各自的优点和缺点。第一种方法需要较少的设置,适合简单的使用,而第二种方法更纯粹(不混合 CSS 和 JavaScript,没有内联样式,这被视为一种不好的做法)。当你开始构建更大、更复杂的应用时,你可能会开始更多地使用第二种方法,但这实际上取决于你。
¥Which method you choose is up to you; both have their advantages and disadvantages. The first method takes less setup and is good for simple uses, whereas the second method is more purist (no mixing CSS and JavaScript, no inline styles, which are seen as a bad practice). As you start building larger and more involved apps, you will probably start using the second method more, but it is really up to you.
到目前为止,我们还没有真正做任何有用的事情!使用 JavaScript 来创建静态内容是没有意义的 - 你不妨将其写入 HTML 中而不使用 JavaScript。它比 HTML 更复杂,并且使用 JavaScript 创建内容还存在其他问题(例如搜索引擎无法读取)。
¥At this point, we haven't really done anything useful! There is no point using JavaScript to create static content — you might as well just write it into your HTML and not use JavaScript. It is more complex than HTML, and creating your content with JavaScript also has other issues attached to it (such as not being readable by search engines).
在下一节中,我们将了解 DOM API 的更实际用途。
¥In the next section we will look at a more practical use of DOM APIs.
注意:你可以在 GitHub (也看到它直播) 上找到我们的 dom-example.html 的完成版本 演示。
¥Note: You can find our finished version of the dom-example.html demo on GitHub (see it live also).
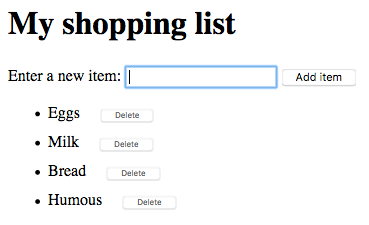
主动学习:动态购物清单
¥Active learning: A dynamic shopping list
在本次挑战中,我们希望制作一个简单的购物清单示例,允许你使用表单输入和按钮动态地将项目添加到列表中。当你将项目添加到输入并按下按钮时:
¥In this challenge we want to make a simple shopping list example that allows you to dynamically add items to the list using a form input and button. When you add an item to the input and press the button:
- 该项目应该出现在列表中。
- 每个项目都应该有一个按钮,按下该按钮即可从列表中删除该项目。
- 输入应该被清空并聚焦,准备好输入另一个项目。
完成的演示将如下所示:
¥The finished demo will look something like this:
要完成练习,请按照以下步骤操作,并确保列表的行为如上所述。
¥To complete the exercise, follow the steps below, and make sure that the list behaves as described above.
- 首先,下载 shopping-list.html 起始文件的副本并在某个地方复制它。你将看到它有一些最小的 CSS、一个带有标签、输入和按钮的 div,以及一个空列表和
<script>元素。你将在脚本中添加所有内容。 - 创建三个变量来保存对列表 (
<ul>)、<input>和<button>元素的引用。 - 创建一个 function,它将响应单击的按钮而运行。
- 在函数体内,首先将输入元素的当前 value 存储在变量中。
- 接下来,通过将输入元素的值设置为空字符串 —
''来清空输入元素。 - 创建三个新元素 - 列表项 (
<li>)、<span>和<button>,并将它们存储在变量中。 - 将跨度和按钮附加为列表项的子项。
- 将 span 的文本内容设置为之前保存的输入元素值,按钮的文本内容设置为 '删除'。
- 将列表项附加为列表的子项。
- 将事件处理程序附加到删除按钮,以便在单击时删除整个列表项 (
<li>...</li>)。 - 最后,使用
focus()方法将输入元素聚焦,准备输入下一个购物清单项目。
注意:如果你真的遇到困难,请看看我们的 完成的购物清单 (也可以看到它的实时运行)。
¥Note: If you get really stuck, have a look at our finished shopping list (see it running live also).
概括
¥Summary
我们对文档和 DOM 操作的研究已经结束。此时,你应该了解 Web 浏览器在控制文档和用户 Web 体验的其他方面的重要部分。最重要的是,你应该了解文档对象模型是什么,以及如何操作它来创建有用的功能。
¥We have reached the end of our study of document and DOM manipulation. At this point you should understand what the important parts of a web browser are with respect to controlling documents and other aspects of the user's web experience. Most importantly, you should understand what the Document Object Model is, and how to manipulate it to create useful functionality.
也可以看看
¥See also
你可以使用更多功能来操作文档。查看我们的一些参考资料,看看你能发现什么:
¥There are lots more features you can use to manipulate your documents. Check out some of our references and see what you can discover:
(有关 MDN 上记录的 Web API 的完整列表,请参阅我们的 Web API 索引!)
¥(See our Web API index for the full list of Web APIs documented on MDN!)